2.22.2016

Paper is the 5th Color


Paper is an analog variable in the world of digital printing. It directly affects the hue in the highlights,  it affects the entire color gamut size for the print job, has a powerful impact on shadows, and is often outside the control of the production workflow.

While many people believe that traditional color management is about managing the CMYK inks and their separations, paper has as much of an influence on the color of the final printed piece as it does on the mechanical and chemical action of the inks or toners. Although a given paper brand’s attributes may be consistent, paper characteristics are not standardized. There is variation in attributes between mills as well as variation around an attribute property from a given mill. Paper is considered a commodity but its properties are a long way from standardized.

A lot has changed in the world of paper. One of the biggest changes in recent years has been the increased use of optical brightening agents (OBAs) in many papers to give the appearance of a very bright white paper. Printers have been known to accuse paper companies of using cheaper goods and “cheating” by using optical brighteners.

The initial choices made on paper selection might not take into consideration the impact later in the production chain, and sometimes those decisions can have unintended consequences.

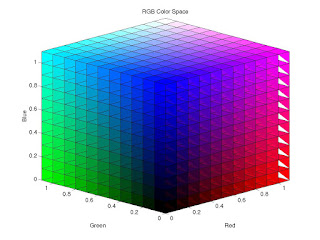
White papers are not RGB 255,255,255. Paper companies control the shade of their papers by adding dyes and other chemicals to affect appearance. More dyes, less reflection, more color compensation. The paper owns some of the color space so detail that requires paper’s hue cannot be reproduced. The recent trends toward blue white papers have resulted in more and more dyes in the paper and further deviations from neutral. Some of today’s papers are equivalent to a 3 percent cyan screen.

Modern color management solutions do allow you to bias your results to either a strictly neutral result with no consideration of paper color, or to neutrality based on the paper color.

This can be very important, as the human eye will quickly key in on the “white” of the paper and judge other colors on the paper based on that shade.

Paper shade, or white point, is the key attribute of paper and is measured using L*a*b* based on CIE XYZ. Described by these three values, color management applications calculate complex color inter- pretations to characterize paper and predict paper’s effect on color reproduction.

OBAs are used to increase the apparent brightness and whiteness of papers and their use is becoming more prevalent in paper manufacturing. They increase brightness and whiteness by absorbing energy in the ultra violet and emitting (fluoresce) the energy in the blue area of the visible spectrum. Because, to the eye, blue/white looks "whiter" than yellow/white OBAs are not really whiteners, but bluing agents. OBAs are also used in ink to expand gamut or brighten 4/C image printed on poor substrates - e.g. newsprint.


While it is not practical for printers to quantitively measure the OBA content of the materials that they use, it is quite an easy matter to qualitatively see the OBA content. All it takes is an inexpensive (less than $15 USD) "black light."

For example, with the black light it is easy to see that the paper used for the Pantone Goe system swatch book (on the left in the image below) contains more OBAs than the conventional Pantone spot color swatchbook on the right. Also, it's clear that the uncoated paper section in the Pantone spot color swatchbook contains more OBAs than the coated section.
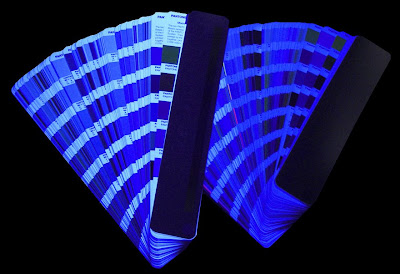
Viewed in light that has an ultraviolet component, the papers appear bright and blue. They have an apparent expanded gamut. However, the printed hues will mutate, or change color depending on the light source. This effect is called metamerism and drives a need for light booths and an understanding of the viewing conditions when color matching or judging color. Simply put, printed hues shift, particularly in the highlight tones, when papers contain optical brighteners.

In reality, the rise in the use of brighteners can be attributed to a host of reasons, including production efficiency for maintaining a consistent look to a paper with changing content and a desire from customers for a brighter sheet at lower cost.

Another, more subtle problem can be the intended colorcast of the sheet. While in some ways we might consider OBAs an unintended colorcast, designers will sometimes purposefully choose a paper that has a colorcast.

The inks that are typically used in four color process printing block, to varying degrees, the fluorescence in papers containing OBAs. Black and magenta block the greatest amount, yellow a lesser amount, and cyan ink least of all. What this means is that when an image is printed using a halftone screen, lighter/pastel tones allow more more of the brightening and color shift of OBAs (towards blue) than the shadows. Color is effectively skewed towards the blue from shadows to highlights – but only when the paper being printed on has a high OBA content.

-----

Maintaining proper viewing conditions for print evaluations is a key part of color management.

The standards for viewing booths have changed over the past couple of years with the most recent release of ISO 3664 Graphic technology and photography — Viewing conditions.

If paper contains optical brighteners, color matching must be done in reference light conditions. When proofing on job stock that contains optical brighteners, it is important to critically examine both separations and curve effectiveness in the cyan containing highlight areas. The cyan/yellow color balance is hardest to achieve with these papers.

Even proofing papers contain optical brighteners. Creating profiles on these papers requires interpretation and tweaking if the press papers have a different level of optical brighteners or if the press papers have no optical brighteners.

Finally, optically brightened papers lose their fluorescence over time especially if exposed to light. The paper yellows. Print hues shift. Once printed, there is no recovery of the original paper whiteness so this should be kept in mind when a job reprints. Trying to match a first printing several months after completion is almost impossible. New proofs are a minimum requirement.

What additional tools can color management bring to the table to help tame the paper problem?

Traditionally, the way to “solve” OBA problems was to ignore them, primarily by using a filter that cut the UV light to stop it from hitting the paper and thus prevented the brightening effect of the OBAs. This is still a very effective approach to process control, but it is no longer the norm in color management. The other way we ignored it was by doing just that, not acknowledging the problem.

Today, we are much more likely to solve the OBA problem by quantifying the amount of OBA by including the UV in the measurement and then adjusting the ICC profile to compensate for its presence. Some recent color solutions provide Optical Brightener Correction (OBC) technology, which allows you to fine tune the profile results by evaluating specific test charts against a series of Munsell color standards in the target viewing condition. This combination of physical standards and measured results allows for a uniquely precise correction for optical brighteners.

An additional parameter that can be handled in color management is the final viewing environment. Traditionally, a graphic arts workflow targets a daylight illuminant (usually noted as D50/2 – describing the illumination and viewing angle). One additional way to fine-tune the result is to define the viewing condition of the final destination or illumination at the intended point of use if it is not D50.

This can be done by either using CIE defined illuminants or by actually measuring the lighting in the final environment.

-----

And what about Glossy Paper?

Paper gloss is related to surface roughness and therefore affects color reproduction. Light of all wavelengths is reflected from the surface of paper. How it is reflected defines both its gloss and dot gain characteristics.  

If the paper is glossy and smooth, it scatters less light and there is less dot gain. Light is reflected almost like a mirror (specular reflection). 

Matte, dull and uncoated papers scatter more light resulting in more dot gain. Also, these papers require more ink to achieve a given density further increasing the dot gain. 

Papers from different manufacturers absorb ink and toner/developer solution differently. There is no overall standard for surface roughness, ink absorptivity or developer absorptivity within the paper classification scheme. For the most accurate color, press profiles should be made on the chosen stock for a particular job. 

Matte and uncoated papers are even more variable.

The best color reproduction will occur on:
  • Bright papers with uniform spectral reflection;
  • Papers that are smooth and glossy;
  • Papers that are neutral in shade; and
  • Papers that exhibit minimal fluorescence.
One curve for all paper surfaces leads to less than optimum color.

----------

Do you have a color management question, horror story or event to share?
Email me at reilley4color@gmail.com

2.08.2016

Tips for Great Color


Tips on Producing Great Color


Good color starts by calibrating all of the devices within the color work flow.
Devices should be calibrated often to ensure that they have not “drifted.” The frequency depends upon your reliance on color. As you know from reading this blog, calibrating brings the device to a known, stable state, and is a baseline.

Calibrating your monitor is just as important as calibrating the print device.
Whatever color space you might be working in, unless your monitor presents you with controlled, managed color, what you see will not match what you get. First, it’s important to think about the problem correctly. The goal isn’t to match the prints to the monitor or the converse. The goal is to make sure both the monitor and the prints reflect, as accurately as possible, the information that is actually in the digital file. There are lots of methods for calibrating your monitor, and it can get quite involved.

Here is a video showing how YOU can calibrate your monitor for FREE.

The major manufacturers of monitor calibration packages for the casual user are Datacolor (the Spyder series ), X-Rite (the i1 series, PANTONE Huey and the ColorMunki) and Integrated Color (ColorEyes Display Pro). All these products are of excellent quality. The first two have several price levels of packages with varying capabilities.

The more expensive packages may include features you don’t need, such as printer profiling and projector calibration, and the ability to customize calibration settings beyond the defaults. The accepted standard is to calibrate to a color temperature of 6500K, a gamma of 2.2 (for both PC and Mac platforms) and a luminance of 90 cd/m2 and these will be the default setting in all the packages. But some of the less expensive packages may not do everything you need, such as luminance adjustment. Check the details.

Some laptop screens may not be able to be calibrated properly, and older or very inexpensive computers may not be able to use a profile. Apple laptops will need the ColorEyes software mentioned above.

An issue with Windows is a utility called Adobe Gamma. If it is in your Startup file it will be loaded on startup and override your calibration settings. Simply go to Start > Programs > Startup, right click the Adobe Gamma Loader and click Delete. (If it’s not there, don’t be concerned.) Don’t be nervous about doing this. It only turns it off as a startup item; it does nothing to what is installed your computer.

A custom ICC profile should be created for each device within the Color Supply Chain.
This process ensures accurate and automatic translation of color values from one device to another, minimizing time and waste during the production process. A Device Link Profile can be established to link devices commonly used in the production process, eliminating the need to specify individual device profiles each time.

Paper, inks and toner impact the ultimate color result. Creating individual device profiles for each paper type, ink and/or toner used delivers a more consistent result. For example, if a proof is being generated on a glossy, coated stock, but the final product is being produced on a matte uncoated stock, these custom profiles can produce a more consistent result.

Spot colors can add time and cost to a printed project. Not all spot colors can be faithfully reproduced with CMYK four-color process. Designers and printers should carefully consider the colors that they are using within the context of the project’s budget and desired outcomes. Many tools exist that can help users determine whether or not a special color can be faithfully reproduced using a CMYK match. It is often necessary to use spot colors to consistently match special corporate colors and to ensure absolute color consistency across a distributed printing process.

Make sure you aren't "duplicating" any colors. 
Look through the color palette in your page layout software. Remove any duplicate colors you find, and reassign the corresponding objects and layers accordingly.

Make sure you give your colors the same names in each application you use for the project. 
For example, make sure you give the color the same name in InDesign as you give it in Photoshop and Illustrator. This will help reduce confusion and ensure the colors separate properly when preparing the piece for print.

Communication among all constituents in the color work flow is essential. This communication should include sharing of ICC profiles, discussion about paper and ink types and proofing models, and more. In doing so, good, consistent color can be produced across widely varying geographies and output technology types.

Using a good RIP in the production process is a critical element in the color work flow. It alleviates many color issues and reduces training challenges. Consistency in settings within the RIP is key to delivering repeatable and known color.

When using digital cameras or scanners for input, if you want your colors to be consistent from shot to shot, or scan to scan, include a color target in the first frame/scan of a sequence. When it comes to processing, set the grey point (and black and white points) using the target reference frame, and your software will match the subsequent batch of images.

Always color correct images in the largest RGB color space available. When images are converted from RGB to CMYK, you lose color information—a lot of it. As a result, you (and your color management tools) have fewer colors to work with, or average, when attempting to make color changes to an image. Also, when images are converted from RGB to CMYK, you’re creating the black separation and reducing the amount of CMY in the image at the same time. Depending upon how much CMY is eliminated in the separation, it can be very difficult—or even impossible—to make color adjustments to an image.

When designing for color output, avoid large solids. While lithographic presses have the ability to reproduce solids evenly, toner-based devices have a tendency to mottle, show unevenness, or even banding. This is because ink and toner are radically different materials. When toner is applied to paper, it is dry. Toner is not actually absorbed into the paper fibers, instead, it is fused to the sheet using both heat and fuser oil, creating a bond. Consistency lies in how evenly the toner was applied to the paper, and how evenly it was fused to the paper.

If tints and large solids must be used in a design, there are some ways to help counteract the uneven appearance associated with toner-based devices. First, try applying a filter (Photoshop Add Noise or Texture filters work well) to the large tint or solids. Another option is to also break up large color areas with other design elements such as text, images, or illustrations.

----------

Do you have a color management question, horror story or event to share?
Email me at reilley4color@gmail.com

2.01.2016

Device Link Profiles

Color profiling software also can generate device link profiles.

A device link is a type of International Color Consortium profile that contains two profiles inside of one. In order to create a device link profile, you select the two profiles, along with settings, and then save these ‘linked’ profiles as a device link profile. A device Link profile always contains a source color space and a destination color space, and the conversions always move from the source color space to the destination color space, saving time in file preparation and processing. They are most useful to people who repeatedly use the same specific configuration.

Why might device link profiles be required?

One example is when a scanner application does not embed the source profile in the document containing the image it creates. Storing the scanner’s profile eliminates the need to request the appropriate source profile each time the user wants to print with a configuration involving that scanner.

Perhaps a user also may want to see how a scanned image looks when printed using a specific printer, or may want to look at many images captured on the same scanner at different times before printing the final image.

Since the same devices are involved each time, the graphics application displays a list of device link profiles that the user had previously created for various configurations, allowing the user to select the appropriate device link profile for the current activity.

Another reason to use device link profiles has to do with maintaining channels in color conversions. Typical ICC color conversions require all of the colors in the file being converted — including the black channel. device link color conversions allow the user to maintain the K channel so that the color conversion can happen without any changes to the K channel — such as converting K type to CMYK type. This can be important when making color conversions for certain types of inkjet proofing where you need to maintain the black channel.

It is even more important for making color conversions during plate generation. When used during ripping or plate generation, the black channel must be maintained and device links are a must. In this scenario the device link is used to make the press simulate another printing condition, or to match a printing condition such as GRACoL. Not every platesetter RIP can use device link profiles, but many can, and for those with RIPs that can’t, there are third party applications that can provide these conversions.

Device links are a required component in conversions between different printing conditions, e.g. from offset to gravure. Black channel conversion is achieved with exacting results. Whether single black or rich black output is specified, the device link will manage the requirement.

Currently device link profiles can’t be embedded or assigned in applications like Photoshop because they contain mathematical information for a color conversion rather than describing a color space. Because of this, device link profiles are more complicated and less flexible than traditional ICC profiles and are classified by the ICC as a special type of profile.

A few other points about device links:
  • only one rendering intent is available, that which was selected at the time the link was created. 
  • links cannot be embedded into images 
  • the rendering intent encapsulated in the link is selected in the 'default intent' field in the profile's header. 
  • a profile sequence tag in link profiles documents the profiles used to create the profile. 
If you are looking to create your own device link profiles, I personally like the iPublishPro 2 software from XRite.
-----------

Do you have a color management question, horror story or event to share?
Email me at reilley4color@gmail.com