Our first reader question!
"Hi great blog, I've learned a lot already. I thought I would ask you a question that confuses me - what the heck is the difference between calibrating and profiling a color printer? The technicians talk about it like they are the same thing. Is that the case?"
~ Daniel M. - Pelham Print
 Hi Dan, thanks for asking. The short answer is - Calibrating is putting the device into a known, stable state, a benchmark. Profiling is using that benchmark as a translation filter at either end of the color work flow.
Maintaining a reliable color environment is essential for the production of accurate and consistent color every time. To achieve a reliable color environment, calibration, profiling and measurement of output devices are critical. A number of affordable solutions exist today that combine all the hardware and software essential to these tasks. To be successful, it’s important that all of the elements in the Color Management work flow are speaking the same language or integrated with each other.
Color management works by two key process - calibration and profiling.
Unfortunately the two processes are often confused with each other, and consequently many people have a poor understanding of what they're all about. It's quite simple really, and this page aims to explain the difference and give you an idea of what's going on, at a basic level, in colour management.
Put simply:
- Calibration sets the device into its best native state using its hardware controls.
- Profiling is the process of measuring and fixing up any remaining inaccuracies in its colour output (by modifying the signal going into the device).
Calibration is using hardware adjustments on a device to set the device into a known, repeatable state (ideally close to some absolute benchmark for that device's behavior).
The frequency of calibration required varies on the print environment and its associated quality standards. In some environments, operators calibrate devices daily or every time that they start a new job or introduce a different paper into the production environment. In other cases, devices may be calibrated on a daily, weekly or even monthly basis.
When calibrating, certain output devices, such as those systems using Fiery, you don’t need to test it with a profiling solution to achieve consistent and/or accurate color. On other systems without Fiery’s capabilities, it is important to use a profiling solution to test the profile patches that go to the printer. Profiling is used to characterize the printer and to ensure optimum color output. Calibration is used to re-set the printer to this optimal desired state.
To help you understand what a profile does, think of it as being like a Photoshop adjustment layer or curve that is applied to and “fixes” the images you see on your screen. It is similar to a Look Up Table (LUT) that contains the "recipe" for converting from one color space to the colorspace of a particular device.
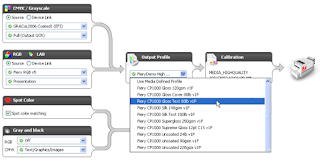
 Profiling solutions generate ICC profiles that characterize the device, allowing a better understanding of its color capabilities. ICC profiles provide a cross-platform device profile format that ensures consistent, device-independent color throughout the entire Color Management work flow. Printer profiles are small files that describe the gamut (range of printable colors) of a specific printer's paper and ink/toner combination (they have a .icc or .icm extension).
Manufacturers typically ship output devices with default profiles, but many operators choose to develop custom profiles to achieve better color results for particular paper characteristics or the characteristics of the printing device.
A color measurement device reads the test pattern/patches. Since spectrophotometers are the most precise, they typically deliver the best results. The on-screen test pattern/patch results are compared to the numerical values associated with the test pattern.
Profiles are generally categorized in the followingways: input profiles (for scanners and cameras); display profiles (for monitors andprojectors); editing space (or working space) profiles, which are often embedded in digital files, such as JPEG or TIFF files; and output profiles (also known as printer profiles).
A solution such as Profile Inspector in Fiery Color Profiler then accepts the profile, and it is uploaded to an output device such as Fiery. This process allows accurate color to be maintained by the output device.
Why is Profiling Important?
Profiles help designers and others early in the Color work flow to better predict the way colors will reproduce at later stages in the process. This color control early in the Color Supply Chain saves time and decreases waste as the job progresses.
You can order standard profiles, or have custom ones built for you. Digital Dog is one such vendor, and ITSupplies builds them for inkjet.
Here is a link from Adobe to download most of the common North American profiles currently in use.
When calibrating, certain output devices, such as those systems using Fiery, you don’t need to test it with a profiling solution to achieve consistent and/or accurate color. On other systems without Fiery’s capabilities, it is important to use a profiling solution to test the profile patches that go to the printer. Profiling is used to characterize the printer and to ensure optimum color output. Calibration is used to re-set the printer to this optimal desired state.
To help you understand what a profile does, think of it as being like a Photoshop adjustment layer or curve that is applied to and “fixes” the images you see on your screen. It is similar to a Look Up Table (LUT) that contains the "recipe" for converting from one color space to the colorspace of a particular device.
 Profiling solutions generate ICC profiles that characterize the device, allowing a better understanding of its color capabilities. ICC profiles provide a cross-platform device profile format that ensures consistent, device-independent color throughout the entire Color Management work flow. Printer profiles are small files that describe the gamut (range of printable colors) of a specific printer's paper and ink/toner combination (they have a .icc or .icm extension).
Manufacturers typically ship output devices with default profiles, but many operators choose to develop custom profiles to achieve better color results for particular paper characteristics or the characteristics of the printing device.
A color measurement device reads the test pattern/patches. Since spectrophotometers are the most precise, they typically deliver the best results. The on-screen test pattern/patch results are compared to the numerical values associated with the test pattern.
Profiles are generally categorized in the followingways: input profiles (for scanners and cameras); display profiles (for monitors andprojectors); editing space (or working space) profiles, which are often embedded in digital files, such as JPEG or TIFF files; and output profiles (also known as printer profiles).
A solution such as Profile Inspector in Fiery Color Profiler then accepts the profile, and it is uploaded to an output device such as Fiery. This process allows accurate color to be maintained by the output device.
Why is Profiling Important?
Profiles help designers and others early in the Color work flow to better predict the way colors will reproduce at later stages in the process. This color control early in the Color Supply Chain saves time and decreases waste as the job progresses.
You can order standard profiles, or have custom ones built for you. Digital Dog is one such vendor, and ITSupplies builds them for inkjet.
Here is a link from Adobe to download most of the common North American profiles currently in use.
----------
Do you have a color management question, horror story or event to share?
Email me at reilley4color@gmail.com
Email me at reilley4color@gmail.com


